Convergent Invoicing: Billing Plan

This post is about Billing Plan(object) in Convergent Invoicing. As per SAP help by Using Billing Plans in Convergent Invoicing, the customer can define when and how frequently they receives an invoice and for what amount. In Utilities perspective, it almost like how Budget Billing works.

Billing Plan is assigned to a Contract or a Contract Account. The Billing Plan divides itself up into Plan Items and Billable Items. The Plan Items contain the rules and information for creating/generating Billable Items with specific amounts and for a predefined date. We can specify individual dates and amounts for the creation of Billable Items or define a Billing Cycle with a fixed amount for the creation of recurring Billable Items. These Billable Items are then invoiced.

The following scenarios are supported:

  • Request/Refund of specific amounts at specified points of time
  • Request of basic charges
  • Payment Plans
  • Discount Plans

The Processing for the above scenarios is done thorough at the level of Individual Billing Plan Items or the Billing Plan Item Types assigned to them.
Billing Plans can be processed periodically in a request run which determines the requested Billing Plan Items for the specified date and last request date and creates the relevant Billable Items.
To configure we need to configure some objects like Billing Plan Type – which controls the processing during Billing Plan item request together with the Billing Plan Item type, Billing Plan Category.
We need to configure the Offsetting Category – which controls the offsetting in Invoicing. The Interface Component needs to be activated for the Billing Class.

For the demo, I have configured a One-off Billing Plan and One Recurring Billing Plan. Not showing any configuration steps as its pretty basic with proper alignment of the Item type and Category with Billing Subprocess, Billable Item Type and Billable Class.

One-Off Billing Plan

Here, I am creating a Billing Plan for a One-Off Charge of 25 EUR for a Contract Account with unlimited Validity. By One Off charge, I mean it’s like an Incentive for the first subscription of an Offer.

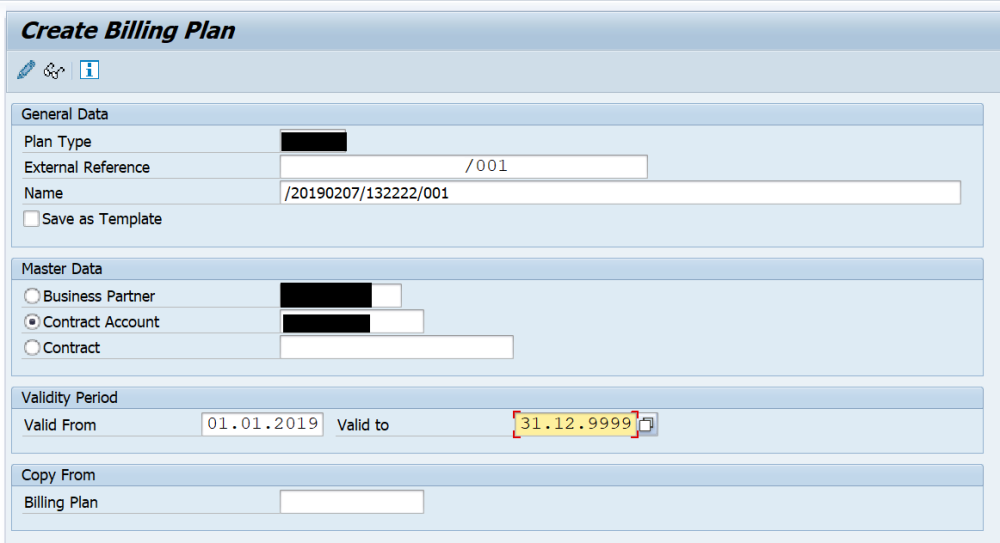
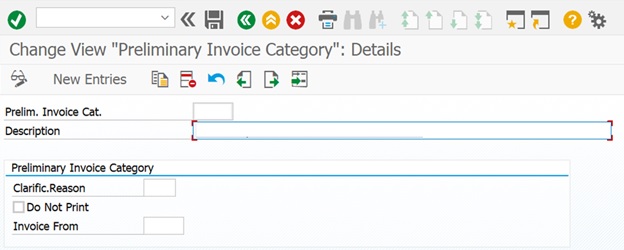
The section highlighted would need to be filled manually. This process can be automated by executing program enhancements.

Below I have filled in the details as shown below. But I have limited the amount here (25 EUR) with Recurring Billing Plan Item checkbox unchecked.

So, when the Billing Plan is released and requested, this would create a One-Off charge Billable Item which can be Billed and Invoiced once requested.

Recurring Billing Plan

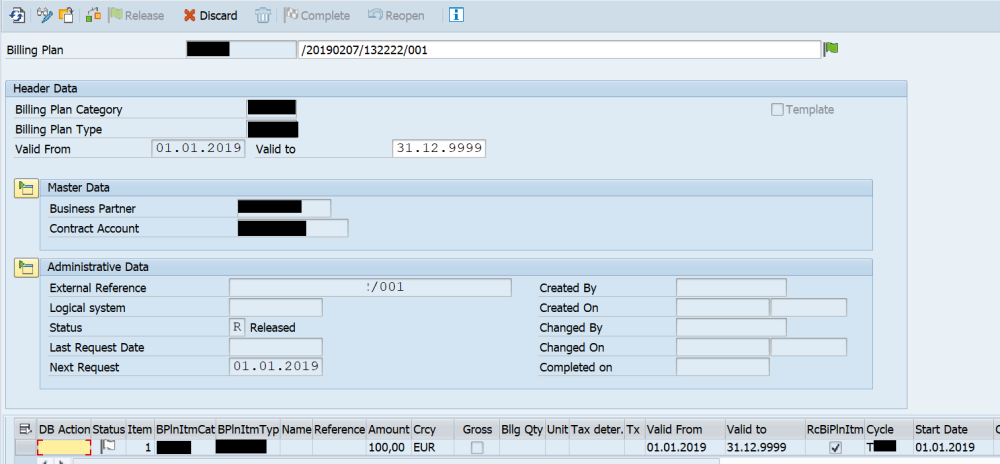
Here, I am creating a Billing Plan for a Recurring Charge of 100 EUR for a Contract Account with unlimited Validity for a Monthly Billing Cycle. By Recurring charge, I mean it’s like a Recurring Monthly Incentive for the subscription of an Offer. Below we can see that the Recurring Billing Plan checkbox is checked.

Now we Release the Billing Plan as shown below.

Once the Billing Plan is released, it looks like below with the Billing Cycle and the amount shown. Before being requested the value can still be changed, Once the Billing Plan is requested then any change would need reversal.

Transaction to create Billing Plan is FKKBIX_BILLPLAN. As shown below we can generate a request for Billing Plan Items.

The Billable Item is generated as shown below. The source transaction be default is BIP.

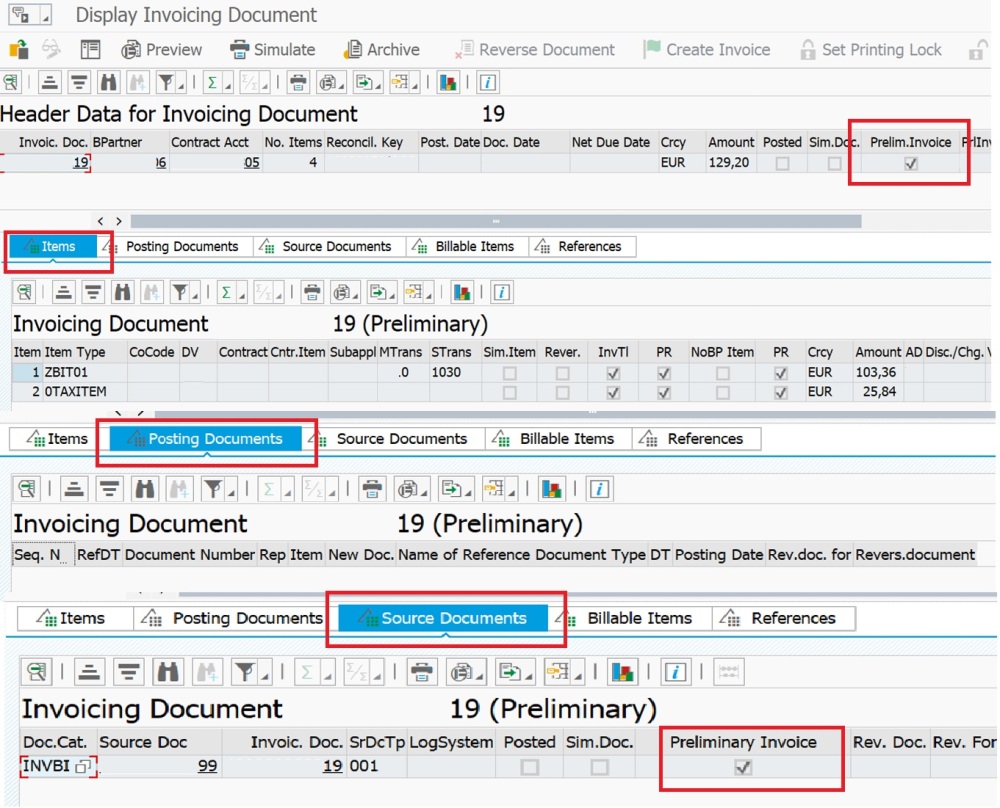
The billable Item can be Billed and Invoiced as shown below. The Reference Object would be BILLPLAN as shown below. The Invoice document shows the Billable Items considered.

That’s it.  😊

Convergent Invoicing: Invoicing of SD Billing Docs

This post is a continuation of the Convergent Invoicing posts(here). We can invoice SD billing documents in Convergent Invoicing. Other External documents can also be invoiced in Convergent Invoicing, provided proper customization is maintained.

In this post the focus is on Invoicing on SD Billing documents in Convergent Invoicing processes and not SD Billing documents functionalities/processes.

Using the invoicing function INV_VBRK_DOC (Invoice SD Billing Documents), we can process documents that are created in Sales and Distribution (SD) and then processed in Convergent Invoicing. The objects involved here are source documents to be invoiced of the source document category SD Billing Document (VBRK). If the source document category SD Documents (VBRK) is set by the Main Selection indicator, then an SD billing document can trigger Invoicing of the related contract account.

000100020003

When an SD billing document is invoiced, the system adds the billing document to an invoicing unit and generates an invoicing document for each invoicing unit. In the invoicing document, the SD items are designated with invoicing item type 0VBRK_IT. These items are considered in the final invoice amount. The system manages an invoicing history and reversal history for the SD billing document.

An invoicing document item (DFKKINVDOC_I) is created for each business partner item. Along with the amount data, the invoicing document item adopts data such as the company code, account determination ID, and main and sub transaction.

The invoicing document item also receives a reference to the SD billing document from which it originates. This link is established by means of the fields SRCDOCCAT (Category of Source Document to Be Invoiced VBRK) and SRCDOCNO (Number of Source Document to Be Invoiced).

For SD billing we need to have some customization in place. I have configured a Sales Document Type in place.

This slideshow requires JavaScript.

Now I am creating a Sales Order for the new Order Type I created earlier. Transaction is VA01.

0006

Gave the few mandatory details for the Sales Order and saved the same.

0007

Now to create  SD Billing Document for the Sales Order created above. Transaction is VF01.

0008

Now the SD Billing document must be released for Convergent Invoicing to process. This can be done in change mode. Transaction is VF02. Click on the button marked below, a success message would be shown in the status bar.

0009

We can see in that the SD Billing document is now shown as an Invoicing Order to be processed in Convergent Invoicing.

0010

But before that I am also creating some BIT items for the same Customer in Convergent Invoicing and executing the Billing also.

This slideshow requires JavaScript.

Now the Invoicing Order has the Billed BITs and the SD Billing Document as shown below.

0013

When I execute Invoicing, we can see both the Invoicing Orders are populated and clubbed into Invoicing Units.

This slideshow requires JavaScript.

As the Invoicing function for SD was marked as Optional, I am now selecting it to be executed.

Now below are the Invoicing document details, which shows the details of the BITs from CI as well as details from the SD Billing Document.

This slideshow requires JavaScript.

Standard help document can be found here. That’s it.

Convergent Invoicing: Collective Invoicing

This post is about Collective Invoicing. The concept is similar like how it’s done in Utilities. So, I can skip on the explanatory text for most part of it.

Primary Requirement is a contract account of the contract account category Collective Bill Account and having it as the Alternative Contract Account in the individual contract accounts we want to bill together. The system then writes all posting records of the individual contract account as statistical document items on the collective bill account.

Now how is it different from Invoicing List?

Using the invoicing list, we can periodically list multiple, existing single invoicing documents in a new invoicing document, and send the overview invoice to the recipients of the single invoicing documents or to an alternative recipient. There is no statistical posting for overview invoice unlike Collective Invoicing. More on Invoicing List.

The Invoicing Function INV_COLLBILL needs to be activated in customization as shown above.1

In addition to the individual invoices, invoicing of the individual accounts creates invoicing orders of the source document category Collective Bill Document (COLBI). For each collective bill, one invoicing document item with invoicing item type 0COLLBIL (Collective Bill) is created in the invoicing document.

The creation of a collective invoicing document covers two process steps:

  1. Invoicing of the individual accounts assigned to a collective bill account
  2. Invoicing of the Collective bill account.

The posting items of the individual documents are summarized in one collective bill per the following criteria:

  • Origin
  • Posting date
  • Due date which is interpreted as a to-date. All collective bills to be invoiced with an earlier or the same due date are selected.
  • Due date for cash discount
  • Cash discount percentage rate
  • Currency
  • +/- sign of amount (credit/receivable)

In addition, in event 2225 (Collective Bill: Summarization Criteria), one can define additional criteria for creating a collective bill, such as Invoicing Process and Invoicing Type.

The statistical collective bill items created during the invoicing of the individual accounts are posted with the clearing restriction 7 (Collective invoice: Only payable after collective billing). This has the effect that the collective bills and the related individual documents cannot be processed until processing in collective invoicing (no clearing, no dunning, no interest calculation).

The following functions are not supported in invoicing of individual accounts:

  • Additional function Dunning in Invoicing
  • Determination of Payment Method
  • Creation of Payment Form

Now a simple process flow.

I have open billable Items for 4 individual Contract Accounts with first Contract Account having credit transaction and rest with debit transactions. Next step is to bill them and check the individual Invoicing Orders.2

The individual Invoicing Orders look like below. We had 4 contract accounts so 4 invoicing orders were generated.3

Make sure of the selection of the Invoicing function for the individual invoices as marked by Step 1 mentioned earlier.4

If we check a single invoice we can see the posting document for collective bill as shown below.5

As the credit/receivable amount (+/- sign of the amount) is a selection criteria for creating Collective Invoicing so, we have 2 Invoicing Orders automatically created for the 4 Contract accounts invoiced. Check the Document category – COLBI.6

As was mentioned earlier the individual account Invoices shall have the clearing restriction 7 in place. Shown below for the first individual invoice.78

Now on Invoicing the invoicing orders of Collective Invoicing.9

Remember to select the Invoicing Function as shown below.10

Once the collective Invoice has been generated we can see the items has been posted.11

That’s it. 🙂

Convergent Invoicing: Invoicing List

This post is a continuation of the Convergent Invoicing posts(here). Invoicing List is used to group multiple Invoicing documents together into one Invoicing document like an Overview Invoicing document which can be sent to all the involved Business Partners or to an alternative recipient.

The single Invoicing document does not lose its identity as an Invoice by being added to the Invoicing list. The document retains its characteristics, both with regards to invoice printing, payment of the invoice amount and posting. There is no posting activity for Invoicing List document. Payments are referenced to the original posting document.

The invoicing list is created using only the information in the single invoicing documents, without considering their clearing status or the related posting documents.

Unlike Collective Invoicing which also groups the invoices of individual customers together in a collective bill, which handles the payment together under a collective bill account, here Invoicing List is just an over view document without any payment clubbed together. There are 2 Invoicing functions for Invoicing list

  • Preselect Invoicing Documents for Invoicing List – This creates an invoicing order for the Invoicing document to be created in the Invoicing List The source document type would be SUBIN.
  • Create Invoicing List – The Invoicing Order created by the above Invoicing function would be used here to club the list of single invoicing documents to form a single Invoicing document. This shall hold the document numbers, tax amount and total amount also.

For defining Alternative recipients, we can use Event 2637. I have used it in my demo here.

An Invoicing Document if clubbed in an Invoicing List can be checked by checking the check box Invoicing sub document in the header, marked below.

Customizing for Invoicing List is here. Financial Accounting (New) -> Contract Accounting Receivable & Payable -> Convergent Invoicing -> Invoicing -> Additional Functions -> Flag Invoicing Document for Invoicing List

Here we specify if an invoicing order is to be created for an invoicing document for entering the invoicing document in an invoicing list. The system interprets this activity in the context of the invoicing function Preselect Invoicing Document for Invoicing List. If we set the indicator here, then the system creates an invoicing order for the invoicing document for source document category SUBIN.

We can create multi-level invoicing lists, meaning that an invoicing list can be entered as a single invoicing document in another invoicing list.

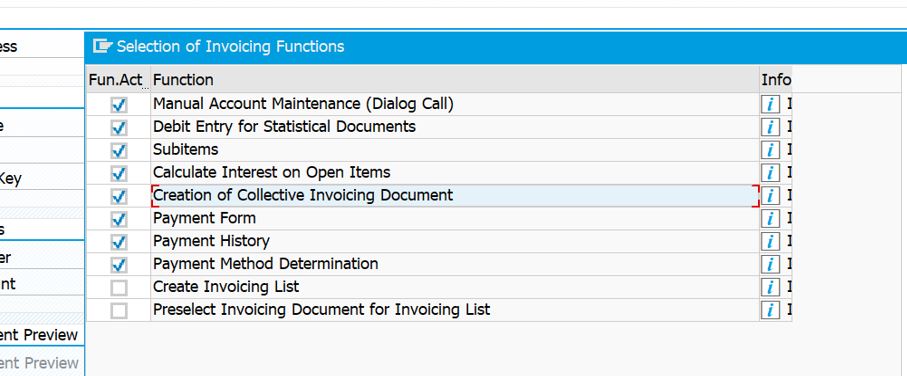
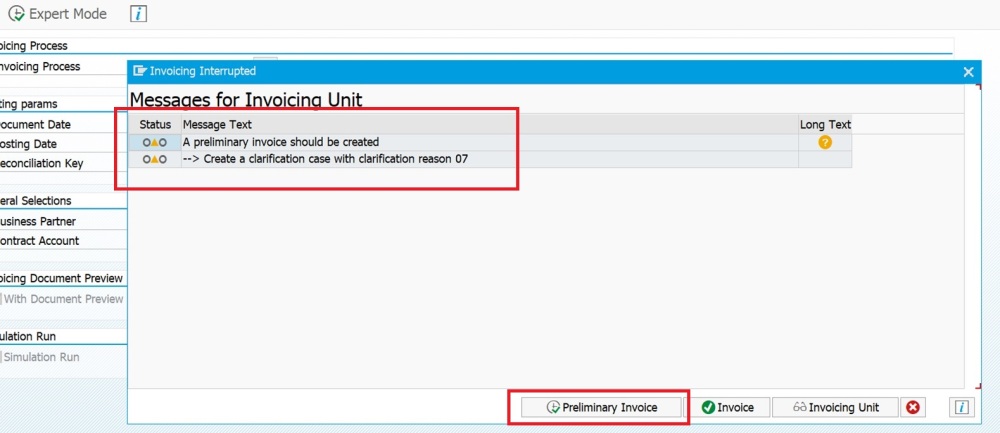
While invoicing the single Invoicing documents, select the Invoicing function as shown below.

So, we have 3 Invoicing document as shown below. Each of the document has the check box shown below checked which marks them for Invoicing List and so creates 3 invoicing orders with source document category SUBIN.

Now proceeding to invoice the Invoicing List. Select the Invoicing function ‘Create Invoicing List’ as shown below.

Below is the Invoicing Document which has all the Single Invoicing document as the shown below in the tab ‘source documents’.

So, that’s it on Invoicing List. I have subsequent posts on Collective Billing and Preliminary Invoice coming up. Stay tuned. 🙂


Convergent Invoicing: Preliminary Invoices

This post is a continuation of the Convergent Invoicing posts(here). Preliminary Invoices as the name suggests is an invoice document before its actual posting. An invoice is preliminary if no postings was generated for it. There might be scenarios where it is necessary to send the invoice to the customer first, for checking before posting the actual or to internally check the invoice before sending it across to the customer for payment. There is an option to print a preliminary invoice also.

Primary requirement is to activate the Invoicing Functions: Creation of Preliminary Invoices and some settings in customization which are explained below.

If the Invoicing Function ‘Creation of Preliminary Invoices’ is activated then it can be seen during Invoicing in Expert Mode as shown below.

1

On invoicing the system creates a new invoicing order for the preliminary invoice with the source document type PRLIN. This source document type is to be added to the selection control of the Invoicing process.

Customizing Setting for Preliminary Invoice can be found here Financial Accounting (New) -> Contract Accounts Receivable and Payable -> Convergent Invoicing -> Invoicing -> Additional Functions -> Define Preliminary Invoice Category

12

Above is the primary screen where we define the Preliminary Invoicing Category. This category is assigned to the Invoicing Category in the subsequent customizing node.

We can have 3 follow up procedures as defined below.

  1. We can define a clarification case and assign it here. So, when a Preliminary Invoice is created it would automatically be in clarification processing (similar to how Out sorting works in Utilities Invoicing). Post on clarification case is here. Clarification case created is of type 07 when the Preliminary Invoice is created. During clarification processing, one can post, print, or reverse the invoice.
  2. Checkbox, if the Preliminary Invoice is to be printed. We have the default option of printing the Preliminary Invoice, this checkbox can stop that.
  3. Number of days a preliminary invoice must have resided in the system before the system invoices it. e.g. We give grace days (say 5 days) for the customer to check the preliminary Invoice and voice their concern. After 5 days, we can proceed with the actual Invoicing and posting.

Clarification case declaration looks like below.

2

Another customization is to include the Preliminary Invoicing category created above for the Invoicing Process. The customizing node for that is Financial Accounting (New) -> Contract Accounts Receivable and Payable -> Convergent Invoicing -> Invoicing -> Additional Functions -> Assign Preliminary Invoice Category

5

So, I have defined 2 cases, for one I have defined a clarification case which would be manually released (see the check box in the above screenshot) and second for the Number of grace days which I have defined as 1 day. That means 1 day after the creation of the Preliminary Invoice, I can proceed with the actual invoicing.

Note: I would not be showing how the BITs are coming in the system and getting processed in Invoicing.

First Case: Creating a Clarification Case of Type 07.

On executing the Invoicing Process, we get the following message which states that Preliminary Invoice is created along with a clarification case.

3

After clicking on the ‘Preliminary Invoice’ execute button we get another popup as shown below. From here we can go to the Preliminary Invoice or to the clarification case.

4

If we consider the Invoicing Orders, we would see a new source document type PRLIN.

6

Now checking the Clarification case processing, we have the option of releasing it or reversing it. I am proceeding to release it as shown below.

7

After releasing we can see a Invoicing document is posted.

8

Second Case: Grace days

Now for the second case where I have defined a grace day of 1 day before actual invoicing. The Preliminary Invoicing category has been defined in the Invoicing category. Executing the Invoicing process, we get the below popup.

9

A Preliminary Invoice has been created as shown below.  There is a check box ‘Preliminary Invoice’ both at header level and sub header level to mark if an Invoice is a Preliminary Invoice. There would be no posting documents in a Preliminary Invoice.

10

The invoicing order shows that the Invoicing Order of Type PRLIN is present. Once we proceed with the actual invoicing after 1 day this along with INVBI would be incorporated with the actual invoice.

11

So, that’s it on Preliminary Invoice. I have subsequent posts on Collective Billing and Invoicing List coming up. Stay tuned. 🙂


Convergent Invoicing : Clarification Lists

This post is on the creation of Clarification cases in Convergent Invoicing. Below I am just presenting a snapshot, more on this can be found here.
I have just done one use case for clarification case category 01 – Source Documents which is shown below the minimal text I have copy pasted here from the help link of SAP CI.

Situations can arise during the processing of billing documents and during invoice creation, where we need to clarify exceptional situations and process them. This can be an automated process or manual and assigned to an agent for post processing.

• This is an application of the Clarification Framework Controller (CFC) and called using transaction FKKINV_CFC.

• Validation checks are necessary to decide whether clarification is needed or not. The elements which are checked are Source documents (clarification case category 01), Invoicing Documents (clarification case category 03), Contract Accounts (clarification case category 04) and Error Messages (clarification case category 06). We can create and apply our own validation rules. We can have multiple checks and can define the sequence in which the checks are to be run when we assign them.

• The checks are processed at various levels like during transfer of billing documents or during billing execution, checking the invoicing order and during invoicing. It is not possible to invoice the source documents or the contract account until these cases have been clarified, either automatically or manually.

• Billing documents are source documents of the source document category INVBI that were created in Billing.

• For check module (Source documents) Function module FKK_SAMPLE_TFK2672 from function group FKKINV_EVENT is available as a sample module.

• For check module (Invoicing Documents) Function module FKK_SAMPLE_TFK2671 from function group FKKINV_EVENT is available as a sample module. The checked invoicing document is marked as a control document for the clarification case in the invoicing document header. This is a simulation document, since no postings are made in Contract Accounts Receivable and Payable.

• A control document, documents the exception situation that led to the creation of the clarification case in Invoicing. It provides the user processing the clarification case with information on the composition of the invoicing unit. After clarification, the control document is no longer needed. After the clarification case has been deleted, the document can be deleted together with other simulated documents.

• The invoicing lock reason specified in the master record for the contract account determines whether invoice clarification is triggered in invoicing for the contract account. If the lock reason is marked in its definition as “To Be Clarified” and is assigned a clarification reason, a clarification case can be created in invoicing for the contract account if the document date used is in the validity period of the invoicing lock. If there is a lock reason without clarification information, the invoicing lock in the contract account prevents invoicing from taking place but the system does not create a clarification case.

• We can create an exception list for messages, by assigning one or more messages (message class and message number) that trigger a clarification case to the invoicing process and optionally to the invoicing type and invoicing category. We can enter a clarification reason for the message in posting area 2673.

• Clarified cases with a contract account reference (clarification case categories 03 to 06) do not influence validation in the invoicing process, irrespective of whether they were clarified automatically or manually. However clarified cases with reference to a source document (clarification case categories 01 and 02) are taken into account: in this case, the system does not check the source document again during the invoicing process.

• Unlike validation in the invoicing process, validation in the billing process validates billing documents. These documents are created in billing. From an invoicing point of view, they represent source documents.

• There are two types of billing process. These are simulated billing and actual billing. For simulated billing, the system does not create any clarification cases, even if a billing document does not pass a check. To enable one to understand why checks have failed without the use of a clarification case, the system writes messages to the application log during billing simulation. For actual billing, the system creates clarification cases. It does not write messages to the application log. However, the application log informs you that a clarification case was created.

• If we reverse a billing document, the system automatically closes any existing clarification cases. The system can then only create new clarification cases for the billing document during a new billing run.

• Every clarification case is uniquely assigned to one contract account.
• A clarification case is classified by a clarification case category.
• Clarification cases with clarification case category 01 or 02 relate to a source document.
• Clarification cases with clarification case type 03, 04, 05 or 06 do not refer to a source document.
• A source document can have a maximum of one clarification case with clarification case category 01.
• It is not possible to assign a clarification case to an invoicing document. An invoicing document can be checked at runtime. If it is found to be implausible then a clarification case can be created with clarification case type 03. The invoicing is then ended early and the invoicing document is not created.
• The clarification case contains status information. The clarification case can have the following statuses during clarification processing:
o New
o Clarify
o In process
o Completed

Below are the Clarification Case Categories.
Clarification Case Category

Below I am setting up the validation for ‘Check source Documents’.
Check Source document customizing

Now the Amount Limit values is been set up. There are 3 limits which can set up, I am working with the first one for now.
Check Source document customizing_1

Execution of the Billing is shown below.
Billing in FICA

The clarification case check is triggered as shown below.
Messages for Billing Document

Info on Clarification Cases Created

The clarification case created is shown when I press the ‘New clarification Case’ button in the previous screen.
List of Clarification Cases

Looking into the details of the clarification case that was created above.
Clarification Case Detail_to be clarified

The work list looks like this for the agent.
Worklist- to be clarified

Once the clarification process is triggered by the agent the status of the document changes as shown below.
Clarification Case Detail_Processing

Once the case has been clarified the status is updated to ‘completed’ as shown in the work list.
Worklist- Completed

Clarification case can be created manually as shown below.
Clarification Case Creation - Manual

The clarification case is in status ‘new’ as created manually.
Clarification Case Detail_New

Once saved it and processing has been triggered by the agent.Clarification Case Detail_Manual Processing

Thanks 🙂

Convergent Invoicing : Selection & Grouping Variants

Continuing with my earlier post on Scheduling in Convergent Invoicing (can be found here) below I am posting on Selection Variants and Grouping Variants.

Selection Variants

The Selection Variants is used to select ‘Billable Items’ of the ‘Billing Item Classes’ which is to be processed in the Billing process. It’s defined at the level of sub-process and at least one Billing item class needs to be assigned in the selection variant.
The selection can be done at 2 levels of Billable Item type and Source Transaction type, so a combination can be defined.

The configuration used for the demo is defined as below.

Billing Item Class Sub-Process Billing Item Type Billing Type
TD01 SP01 BIT0 BT01
TD01 SP01 BIT1 BT01
TD01 SP02 BIT1 BT01
TD02 SP02 BIT1 BT01


Configuring Selection Variant

Sequence number defined above is 0 (field SelN). It is used so that for each Billable Item Class, multiple valid combinations of Billable Item Types and Source Transaction Types can be used.

For multiple selections with same sequence number the system links the Billable Item Types and Source Transaction types with a logical AND condition. If they have different sequence numbers, then the system links them using a logical OR condition. This works within one Billable Item Class at a time. So interpretation for TD01 and TD02 is done separately.

The selection variant is assigned to the Billing Process.

Selection Variant Assigned to Billing Process

So before showing how the selection variant works below are the billable items all at one go showing all the combinations of Billable items for each class, sub-process and item type.

Display All Billable Items

Now with the Selection Variant in play: The Billable items are grouped into separate billing units as shown below for the combination defined. Note: There is no Grouping Variant defined till now. Billing class TD01 has a single Billing unit for itself and TD02 has another Billing unit.

Creation of Billing Units_Selection Variant

Now the combination has been changed as shown below.

Billing Item Class Sub-Process Billing Item Type Billing Type
TD01 SP01 BIT0 BT01
TD01 SP01 BIT1(Removed/Excluded) BT01
TD01 SP02 BIT1(Removed/Excluded) BT01


Now even if we remove Billing Item Type (BIT1) or mark it as ‘excluded’ as shown below:

Change in Selection_Selection Variant

As shown only the ‘billable items’ of Billable Item Type (BT01) is only considered for billing process.

Creation of Billing Units_Selection Variant_

Grouping Variant

Now that selection variant helps to select the billable items based on the billing item types and source transactions. The grouping of the selected billable items is done by billing units defined by the grouping variant. Each billing unit created internally, is the base for each billing document.

So on the configuration front we need to have grouping characteristics (structure FKKBIX_BILLITEM_IT) defined. If the field is a custom field then we need to fill in the function module to provide the value. Here Bill_Amount is a standard field in the structure.

Maintain Grouping Characteristics

Then the grouping variant where the grouping characteristic is used:

Assign Grouping Characteristics

The Grouping Variant is defined for the Billing Process along-with the selection variant which has both the Billing Item classes defined.

Change in Billing Process_Grouping Variant

The grouping characteristics ‘Bill_Amount’ is defined to segregate the Billable Items into groups to define ‘Billing Units’ after the selection variant has done the selection. The selection variant defined selects the billable items based on the Billing Item Classes.

Creation of Billing Units_Grouping Variants

As we see the billing items are put into separate billing units.

So based on the grouping characteristics (multiple entries) we can have a plethora of combinations.  That‘s just a simple demo on how Selection Variant and Grouping Variant works in Convergent Invoicing.  🙂

Convergent Invoicing : Scheduling

Convergent Invoicing (CI) or I should say BRIM has been a hot topic for some time. Though its usage(talking about BRIM) in Utilities is still not clear, (Prepaid scenarios, Demand Management System and Consume to Cash scenarios, not thought of here 😛 ) I still went ahead to post something on this(talking about CI now). Instead of blogging on the master data used in CI or the basic architecture etc., I would be writing up on the basic processes which are present in the solution.  This would be the standard processes as mentioned in the SAP documentation. So if you are looking to learn about the basics of CI then please refer to this link here or the SAP course AC245.

The below post is on Scheduling.

The system has to determine the target date for billing the billable items. The target date for billing is the earliest possible billing time for a billable item. Scheduling helps to distribute the load on the system, as well as allowing us to specify a customer-specific billing date.

We can use the billing cycle (maintained in Contract Account and Provider Contract) to influence the determination of the target date of billing and the target date of invoicing. If a billing cycle is entered in the Contract Account, then this applies (if no further changes are made) to both Billing and Invoicing. We can have a different billing cycle in the Provider Contract and in the Contract Account. The billing cycle is used to specify billing periods. The billing cycle specifies the period end and the length of a billing period. Scheduling can be configured for Billing and Invoicing processes in the system.

Regardless of whether or not billing cycles are used, we can influence the billing date and invoicing date as follows:

  • Specify grace days, such as two days after the creation of the invoicing order.
  • Define periods, such as every 14 days.
  • Configure special factory calendars.

If billing cycle is maintained in the master data and no separate rules are present, then the system determines the dates based on the end of period. Else this condition of ‘end of period’ is ignored.
Only in expert mode for billing, we can bill billable items before they reach the target date.

Example: Billable items from the month of January are not transferred into the system until February. The invoice for the month of February, therefore, has a billing time span that goes back into January, whereas the billing period consists only of the month of February.

Rule 0001 : Baseline date in Current Month
  1. For a billable item created on October 10, the following dates result based on the system configuration:
  • Baseline date for determining the target date of billing is October 10.
  • Billing is cycle-based in relation to the period end. The system determines the end of the billing period in which October 10 lies. As per first subset of the rule 0001: Any date on and before October 13 which falls in this period would need to be billed by October 15.
  • The system adjusts the baseline date for determining the target date to the period end that was determined. That means that the baseline date is October 15.
Rule 0001 : Baseline date in Next Month
  1. For a billable item created on October 20, the following dates result based on the system configuration:
  • Baseline date for determining the target date of billing is October 20.
  • Billing is cycle-based in relation to the period end. The system determines the end of the billing period in which October 20 lies. As per the second subset of the rule 0001: All dates after October 13 will fall in the next period which ends on November 15. As factory calendar is maintained November 15 turns out to be a weekend so the date changes to November 17.
  • The system adjusts the baseline date for determining the target date to the period end that was determined. That means that the baseline date November 17.

Above we have played with the fields of ‘Fixed Date’. ‘Add Months’ just adds a month to the ‘Date Limit To’ field. Below is another scenario of ‘Additional Days’.

Rule 0001 : Use of Additional Days
  1. For a billable item created on October 13, the following dates result based on the system configuration:
  • Baseline date for determining the target date of billing is October 13.
  • Billing is cycle-based in relation to the period end. The system determines the end of the billing period in which October 13 lies. As per the first subset of the rule 0001: All dates will have 3 days added to the baseline date.
  • The system adjusts the baseline date for determining the target date to the period end that was determined. That means that the baseline date October 16.

So below are the screenshots of the billing units used in the Billing Process which highlights the above 3 scenarios. Point to note would be the columns ‘Bill From’, ‘From Date’ and ‘To Date’.

Billable Items for Point 1
Billable Items for Point 2
Billable Items for Point 3

As written earlier the concept of billing cycle is also the same. Below I have defined a weekly billing cycle and defined it in the contract account. Execution not shown.

Configuring a Billing Cycle
Billing Cycle in Contract Account

So this is it. I have not put in any major business scenario as I am still exploring. Any comment /feedbacks would be most helpful and appreciated. 🙂